Want to make homemade dog treats without turning on the oven?
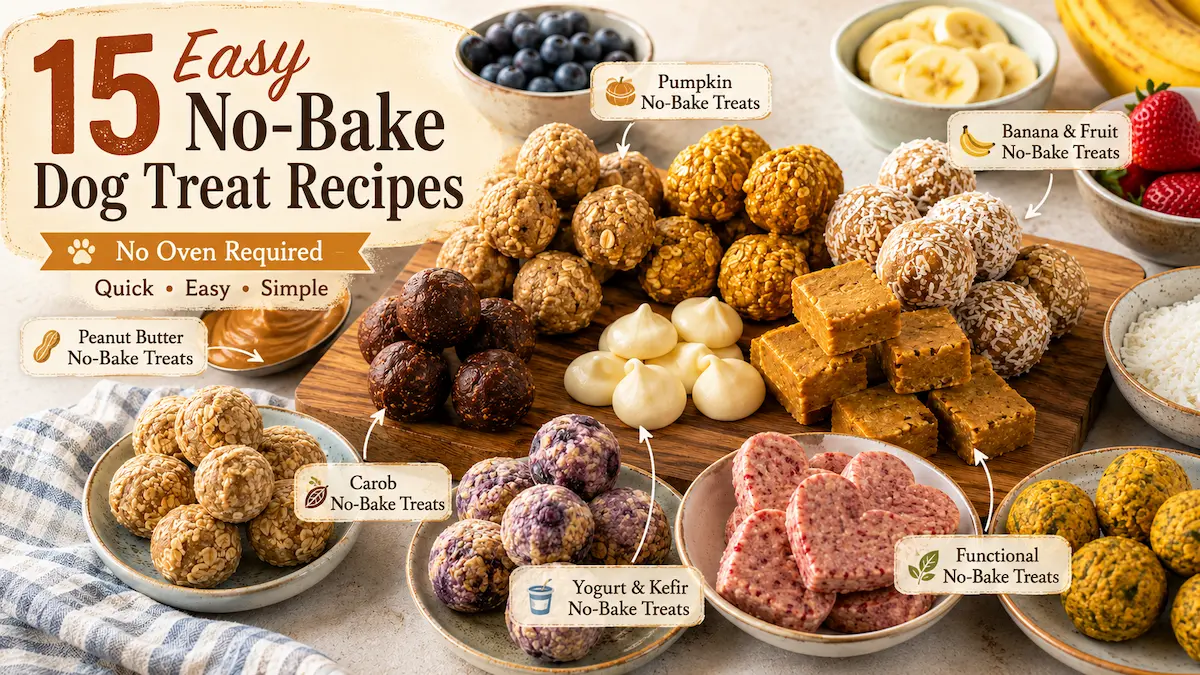
These no bake dog treats are easy, colorful, and made with simple ingredients like peanut butter, pumpkin, banana, oats, yogurt, blueberries, strawberries, and carob.
You’ll find 15 different recipes here, from 3-ingredient peanut butter balls and soft pumpkin yogurt drops to strawberry banana hearts and no-bake training treats.
Most need only 10 to 20 minutes of active prep. Mix, shape, chill, and your dog’s treat stash is ready.
⚠️ Dog Treat Safety:
- Always check peanut butter and other packaged ingredients for xylitol, which is toxic to dogs.
- Use plain pumpkin puree rather than pumpkin pie filling, and choose plain unsweetened yogurt or kefir.
- Treats should be extras rather than a replacement for a complete and balanced diet and should generally stay under 10% of your dog’s daily calories.
- Dogs with allergies, digestive problems, medical conditions, or prescription diets may need different treats.
Which No Bake Dog Treat Should You Make?
Not sure which of the 15 recipes to start with? Pick based on what you already have in the kitchen or the kind of treat you want.
| If You Want… | Try These |
|---|---|
| The easiest first recipe | #1 Peanut Butter No Bake Balls |
| A 3-ingredient treat | #1 Peanut Butter Balls or #8 Banana Oat Balls |
| No peanut butter | #5, #8, #9, #10, #11, #12, #14 or #15 |
| A soft treat | #6 Pumpkin Yogurt Drops or #11 Yogurt Honey Drops |
| A small training treat | #1 Peanut Butter Balls or #13 Carob Peanut Butter Balls |
| Something pretty and colorful | #9 Blueberry Bites or #10 Strawberry Banana Hearts |
| An easy press-and-slice batch | #3 Peanut Butter Pumpkin Squares or #7 Pumpkin Peanut Butter Bars |
| A hot-weather treat | #9, #10, #11 or #12 served chilled |
First time making no bake dog treats? Start with Recipe #1. It’s simple, forgiving, and uses ingredients many dog parents already keep at home.
15 Easy No Bake Dog Treat Recipes
🥜 Peanut Butter No Bake Dog Treats
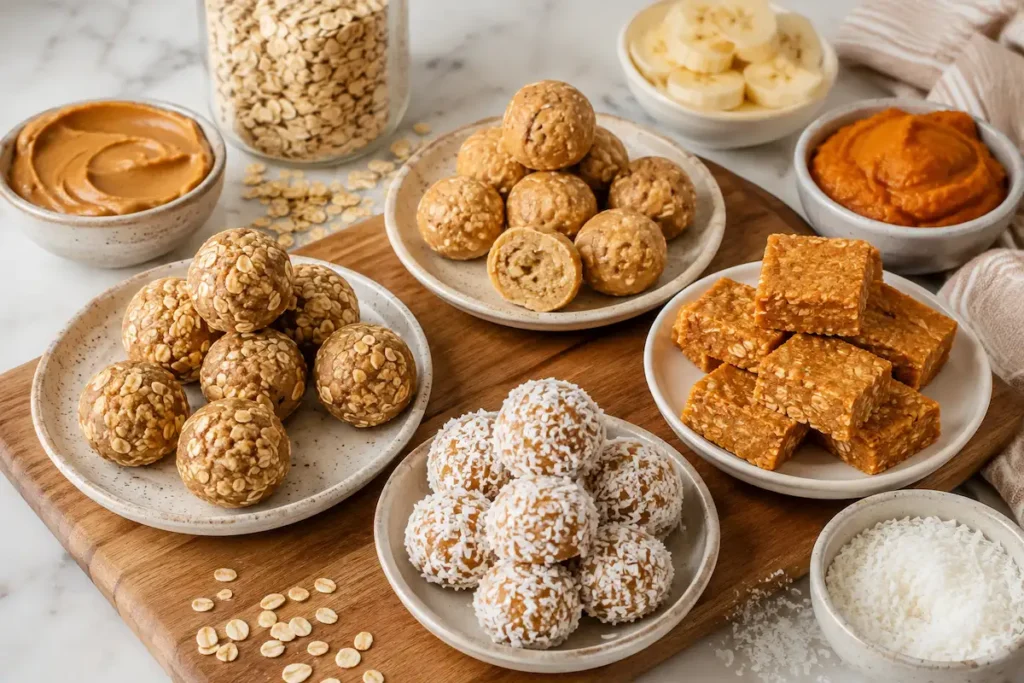
1. 3-Ingredient Peanut Butter No Bake Dog Treat Balls
⭐ Best for: The easiest place to start
Three ingredients. One bowl. No oven.
These classic peanut butter oat treats are simple enough for a first batch and easy to make smaller when you want bite-size rewards.
🥣 Ingredients
- ½ cup natural peanut butter, xylitol-free
- 1 cup rolled oats
- 2 tablespoons honey
👩🍳 Instructions
- Stir the peanut butter and honey together until smooth.
- Add the rolled oats and mix until everything is evenly coated.
- Let the mixture rest for 5 minutes so the oats can absorb some moisture.
- Scoop small portions and roll gently between your hands.
- For easier serving, lightly flatten each ball into a small bite.
- Place on a parchment-lined tray.
- Refrigerate for at least 1 hour until firm.
💡 Tips:
- Too sticky? Add rolled oats one tablespoon at a time.
- Too dry? Add a small spoonful of peanut butter until the mixture holds together.
- Make them training-size: Use about half the normal amount for each bite.
🧊 Storage: Keep refrigerated in a covered container. Freeze extras for longer storage.
2. Peanut Butter Banana No Bake Bites
⭐ Best for: Peanut butter + banana lovers
Banana makes these no-bake bites softer and naturally sweeter than the classic peanut butter oat version.
It also lets you use a little less peanut butter while still keeping the mixture easy to shape after resting. A great choice when you have an overripe banana ready to use.
🥣 Ingredients
- ½ cup natural peanut butter, xylitol-free
- 1 ripe banana, mashed
- 1½ cups rolled oats
- 1 tablespoon honey, optional
👩🍳 Instructions
- Mash the banana until smooth.
- Stir in the peanut butter.
- Add honey if using.
- Mix in the rolled oats.
- Let the mixture rest for 5 to 10 minutes.
- Scoop and shape into small bites.
- Refrigerate for at least 1 hour.
💡 Tips
- Skip the honey if you want: The banana already adds plenty of natural sweetness.
- Mixture too soft? Add rolled oats one tablespoon at a time until it holds its shape.
- Use a ripe banana: Softer, riper bananas mash more smoothly and blend more evenly into the mixture.
🧊 Storage: Keep refrigerated for up to 4 days or freeze for up to 3 months. Because of the fresh banana, these don’t keep quite as long in the fridge as Recipe #1.
Have more ripe bananas to use up? Try these easy banana dog treats for even more homemade ideas.
3. Peanut Butter Pumpkin No Bake Squares
⭐ Best for: Easy big-batch prep without rolling
This press-and-slice recipe is one of the easiest ways to make a larger batch of no-bake treats.
Peanut butter and pumpkin create a soft, rich base, while oat flour makes the mixture firm enough to press into a pan, chill, and slice into neat little squares.
🥣 Ingredients
- ½ cup natural peanut butter, xylitol-free
- ½ cup plain pumpkin puree
- 1½ cups oat flour
- 1 tablespoon honey, optional
👩🍳 Instructions
- Mix the peanut butter and pumpkin until smooth.
- Stir in honey if using.
- Add the oat flour and mix until a thick, pressable dough forms.
- Press firmly into a parchment-lined 8×8-inch pan.
- Smooth the top with the back of a spoon or damp fingers.
- Refrigerate for about 2 hours.
- Slice into small dog-size squares.
💡 Tips:
- For cleaner cuts: Dip a sharp knife in water between slices to help prevent the edges from crumbling.
- For small dogs: Cut the squares again into tiny cubes.
🧊 Storage: Keep refrigerated for up to 5 days or freeze for up to 3 months.
4. Peanut Butter Coconut No Bake Bites
⭐ Best for: Active dogs and higher-value training rewards
Peanut butter and coconut oil make these bites one of the richer, more calorie-dense treats in the collection, while shredded coconut adds texture and a distinctive finish.
They can work especially well as an occasional higher-value reward when you want something more exciting than a basic oat bite.
🥣 Ingredients
- ½ cup natural peanut butter, xylitol-free
- 2 tablespoons coconut oil, melted
- 1 cup oat flour
- ¼ cup unsweetened shredded coconut
- Extra shredded coconut for rolling
👩🍳 Instructions
- Stir the peanut butter and melted coconut oil together.
- Add the oat flour and shredded coconut.
- Mix until combined.
- Let the mixture rest for 5 minutes.
- Shape into small bites.
- Lightly roll each one in additional shredded coconut.
- Refrigerate for at least 1 hour.
💡 Tip
- Keep them chilled: Coconut oil softens at around 76°F (24°C), so these treats can become soft in warm rooms or during summer.
🧊 Storage: Keep refrigerated for up to 5 days or freeze for up to 3 months.
🎃 Pumpkin No Bake Dog Treats
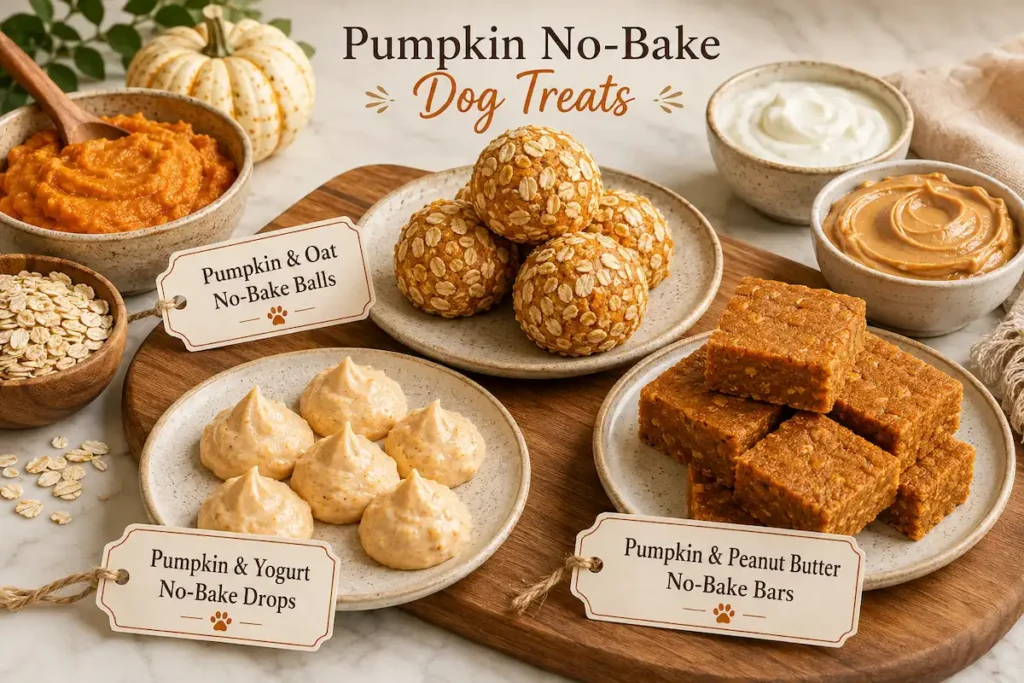
5. Pumpkin Oat No Bake Balls
⭐ Best for: A simple, fiber-rich treat without peanut butter
Pumpkin and oats make this one of the most fiber-forward no-bake treats in the collection.
The recipe is deliberately simple, so the pumpkin stays front and center while the finished bites remain soft and slightly chewy rather than dense like peanut butter-based treats.
🥣 Ingredients
- ½ cup plain pumpkin puree
- 1½ cups rolled oats
- 1 to 2 tablespoons honey, optional
👩🍳 Instructions
- Mix the pumpkin and honey until smooth.
- Stir in the rolled oats until evenly combined.
- Let the mixture rest for 5 minutes so the oats can absorb some of the moisture.
- Scoop small portions and roll into bite-size balls.
- Refrigerate for at least 1 hour until firm.
🧊 Storage: Keep refrigerated for up to 5 days or freeze for up to 3 months.
6. Soft Pumpkin Yogurt No Bake Drops
⭐ Best for: Puppies, senior dogs, and dogs that prefer softer treats
These are the softest treats in the collection, with a texture closer to a thick drop cookie than a firm ball.
Pumpkin adds fiber while plain Greek yogurt brings extra protein and probiotics, making them a nice softer option for puppies, seniors, or dogs that struggle with firmer treats.
🥣 Ingredients
- ½ cup plain canned pumpkin
- ½ cup plain Greek yogurt, unsweetened
- 1 cup oat flour
- 1 tablespoon honey
👩🍳 Instructions
- Mix the pumpkin, yogurt, and honey until smooth.
- Stir in the oat flour until a thick, scoopable batter forms.
- Drop teaspoon-size portions onto a parchment-lined tray using two spoons.
- Refrigerate for 2 hours until set.
💡 Tips & Notes
- Consistency check: The mixture should hold a soft mound rather than run flat across the tray.
- Dairy tolerance: Some dogs don’t tolerate dairy well, so skip yogurt-based treats if it causes digestive upset for your dog.
🧊 Storage: Keep refrigerated for up to 4 days or freeze for up to 3 months. Because these contain yogurt, they don’t keep as long in the fridge as the drier oat-based treats.
If your dog loves yogurt-based treats, these 3-ingredient yogurt banana dog treats are another easy option to keep in the freezer.
7. Pumpkin Peanut Butter No Bake Bars
⭐ Best for: A richer, more substantial pumpkin treat
These are the most substantial no-bake treats in the pumpkin section.
Peanut butter adds richness and density that the simpler pumpkin-oat recipes don’t have, while the press-and-slice format makes it easy to prepare a full batch without rolling individual treats.
🥣 Ingredients
- ½ cup plain canned pumpkin
- ¼ cup natural peanut butter, xylitol-free
- 1½ cups oat flour
- 1 tablespoon honey
👩🍳 Instructions
- Mix the pumpkin, peanut butter, and honey until fully combined.
- Stir in the oat flour until a firm, pressable mixture forms.
- Press evenly into a parchment-lined 8×8-inch pan.
- Refrigerate for 2 hours until firm.
- Slice into small bars or squares.
💡 Tip: Cut some into regular squares and some into tiny cubes for training.
🧊 Storage: Keep refrigerated for up to 5 days or freeze for up to 3 months.
🍌 Banana & Fruit No Bake Dog Treats
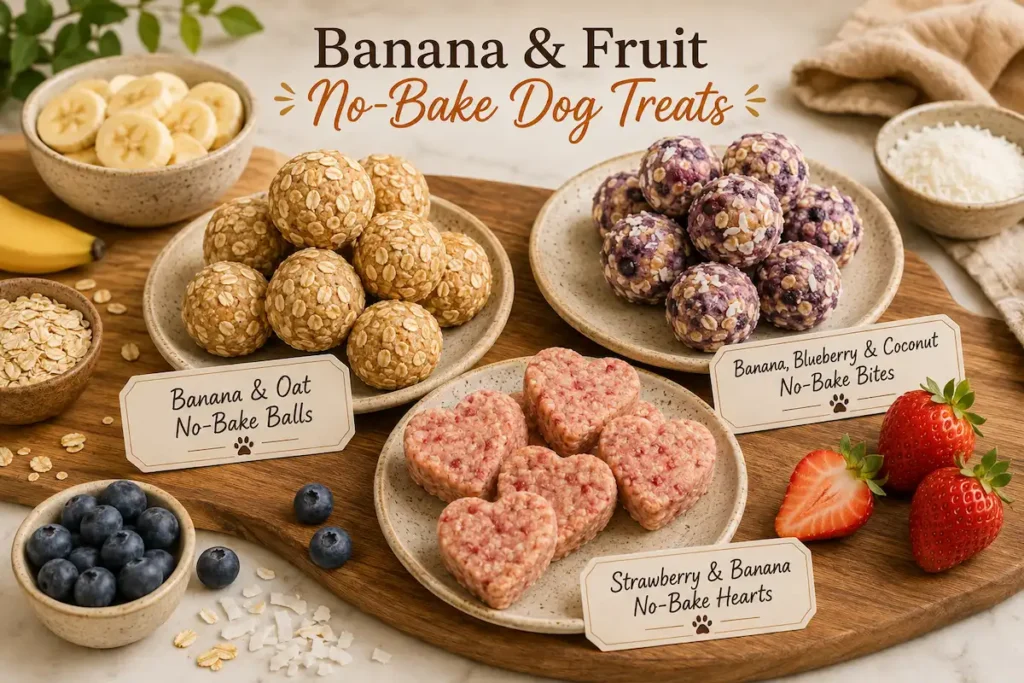
8. 3-Ingredient Banana Oat No Bake Balls
⭐ Best for: A simple peanut-butter-free treat
Three ingredients, no peanut butter, no pumpkin, and no oven required.
Banana provides the moisture and natural sweetness, while oats give these bites a softer, chewier texture than the peanut butter versions. It’s one of the simplest recipes in the collection when you have ripe bananas ready to use.
🥣 Ingredients
- 2 ripe bananas, mashed
- 1½ cups rolled oats
- 1 tablespoon honey
👩🍳 Instructions
- Mash the bananas until completely smooth.
- Mix in the honey.
- Stir in the rolled oats until evenly combined.
- Let the mixture rest for 10 minutes so the oats can absorb some of the moisture.
- Scoop small portions and roll into bite-size balls.
- Refrigerate for at least 1 hour until firm.
💡 Tips:
- Use very ripe bananas: Brown-spotted bananas mash more easily and work best for this recipe.
- For a different finish: Roll a few treats lightly through finely ground oats before chilling.
🧊 Storage: Keep refrigerated for up to 4 days or freeze for up to 3 months.
9. Banana Blueberry Coconut No Bake Bites
⭐ Best for: A colorful, fruit-forward treat
Blueberries create natural purple streaks through the banana-oat mixture, while shredded coconut adds extra texture and little flecks of white.
Besides being one of the most colorful recipes in the collection, these bites are a fun way to add blueberries to a simple no-bake treat.
🥣 Ingredients
- 2 ripe bananas, mashed
- ¼ cup fresh blueberries, mashed
- 1½ cups rolled oats
- 2 tablespoons unsweetened shredded coconut
👩🍳 Instructions
- Mash the bananas until smooth.
- Lightly mash the blueberries separately.
- Combine the banana, blueberries, and shredded coconut.
- Stir in the rolled oats.
- Let the mixture rest for 10 minutes.
- Gently roll into small bites.
- Refrigerate for at least 1 hour until firm.
💡 Tips:
- Make them prettier: Don’t completely puree the blueberries. A little purple marbling makes the finished treats much more visually interesting.
- Summer idea: Chill well before serving or freeze a small batch for a colder treat.
🧊 Storage: Keep refrigerated for up to 3 days or freeze for up to 3 months. Because these contain fresh blueberries, they have a slightly shorter refrigerator shelf life than the simpler banana-oat treats.
10. Strawberry Banana No Bake Hearts
⭐ Best for: Valentine’s Day, birthdays, spring, or just because they’re cute
Strawberries and banana give these no-bake treats a naturally pink color without food dye.
Instead of rolling the mixture into balls, press it into heart-shaped silicone molds for an easy festive treat that works especially well for Valentine’s Day, birthdays, spring, or anytime you want something a little more special.
🥣 Ingredients
- 1 ripe banana, mashed
- ½ cup fresh strawberries, hulled and mashed
- 1½ cups oat flour
- 1 tablespoon honey
👩🍳 Instructions
- Mash the banana and strawberries together until well combined.
- Mix in the honey.
- Stir in the oat flour until a firm, pressable dough forms.
- Press the mixture firmly into heart-shaped silicone molds.
- Refrigerate for 2 hours until firm.
- Gently remove the treats from the molds.
💡 Tip: No heart mold? Paw prints, bones, flowers, or other small silicone molds work just as well.
🧊 Storage: Keep refrigerated for up to 3 days or freeze for up to 3 months.
Love the strawberry idea? These homemade strawberry dog treats give you even more ways to use fresh berries.
🥛 Yogurt & Kefir No Bake Dog Treats
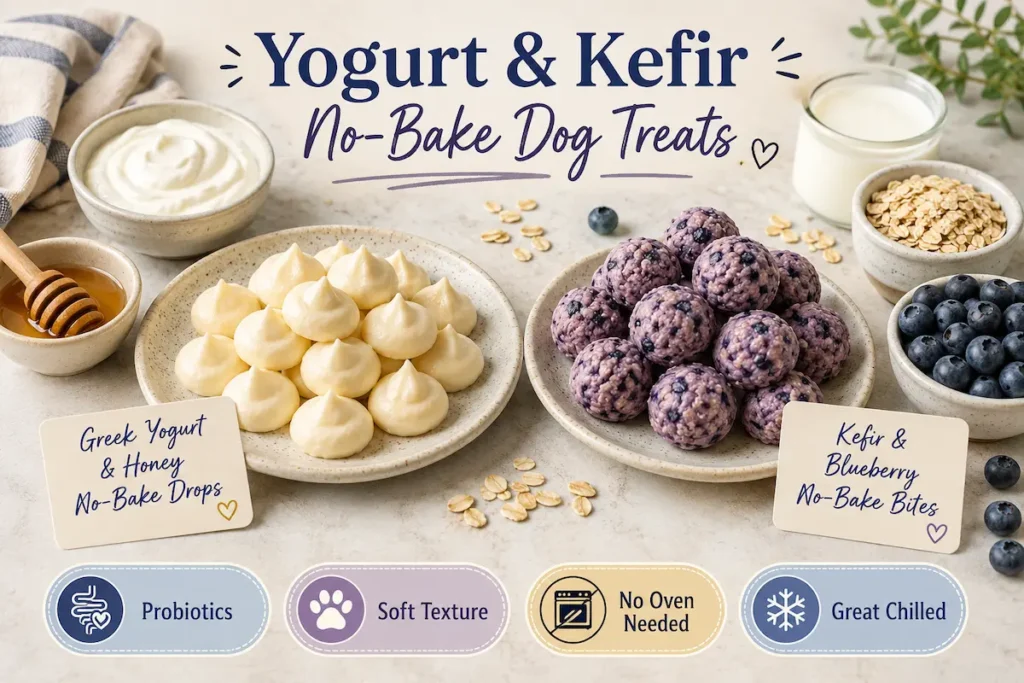
11. 3-Ingredient Greek Yogurt Honey No Bake Drops
⭐ Best for: A simple, soft probiotic treat
Greek yogurt gives these no-bake drops a soft texture and a mild tang, balanced by a little honey. With just three ingredients and no rolling required, they’re one of the simplest yogurt-based treats in the collection.
🥣 Ingredients
- 1 cup plain Greek yogurt, unsweetened
- 1½ cups oat flour
- 2 tablespoons honey
👩🍳 Instructions
- Mix the yogurt and honey until smooth.
- Stir in the oat flour until a thick batter forms.
- Drop teaspoon-size portions onto a parchment-lined tray.
- Refrigerate for 2 hours until set.
💡 Tips & Notes:
- Dairy tolerance: Some dogs don’t tolerate dairy well, so skip yogurt-based treats if it causes digestive upset.
- Hot-weather variation: Freeze small portions instead of refrigerating them if your dog tolerates dairy.
🧊 Storage: Keep refrigerated for up to 4 days or freeze for up to 3 months.
12. Kefir Blueberry No Bake Bites
⭐ Best for: A colorful, gut-friendly treat
Kefir and blueberries give these soft bites a naturally tangy flavor and beautiful purple color. They’re a nice alternative to Greek yogurt treats when you want something different while still keeping the recipe simple.
🥣 Ingredients
- ½ cup plain kefir, unsweetened
- ½ cup fresh blueberries, mashed
- 1½ cups oat flour
- 1 tablespoon honey
👩🍳 Instructions
- Mash the blueberries until mostly smooth.
- Mix in the kefir and honey.
- Stir in the oat flour until a thick, scoopable batter forms.
- Drop teaspoon-size portions onto a parchment-lined tray.
- Refrigerate for 2 hours until set.
💡 Tips & Notes
- Consistency check: Because kefir is thinner than Greek yogurt, add a little extra oat flour if the mixture spreads instead of holding a soft mound.
- Choose plain kefir: Use plain, unsweetened kefir without added sweeteners.
🧊 Storage: Keep refrigerated for up to 3 days or freeze for up to 3 months. The fresh blueberries and kefir give these a shorter refrigerator shelf life than the drier oat-based treats.
🍫 Carob No Bake Dog Treats
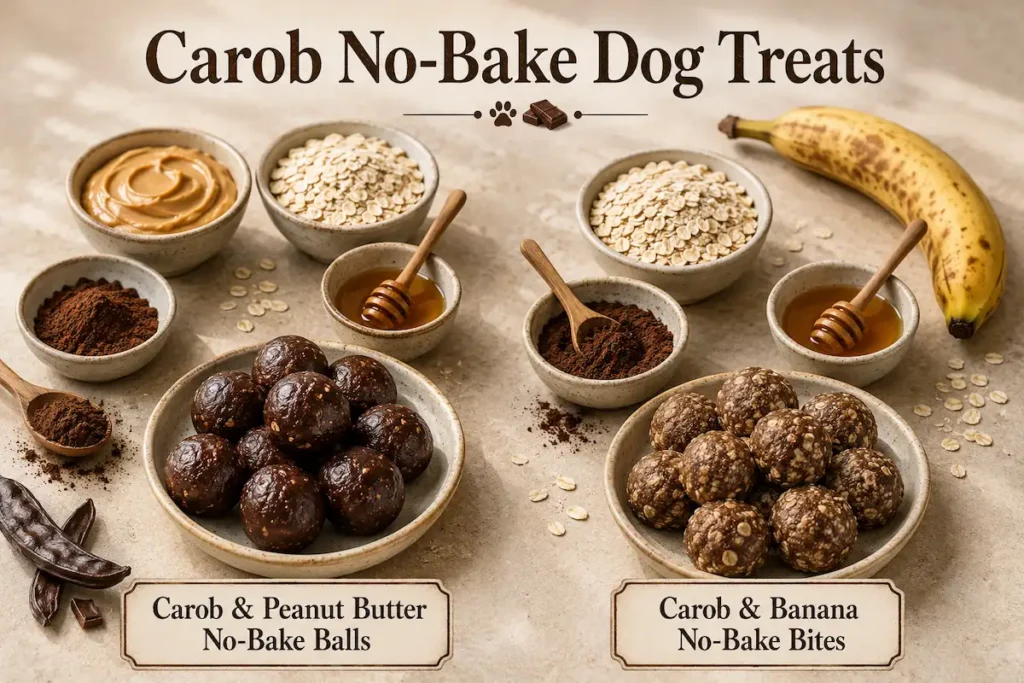
13. Carob Peanut Butter No Bake Balls
⭐ Best for: Small, high-interest training rewards
Want the rich dark look of a chocolate treat without actually using chocolate? Carob gives these peanut butter bites their deep brown color.
🥣 Ingredients
- ½ cup natural peanut butter, xylitol-free
- 2 tablespoons unsweetened carob powder
- 1 cup oat flour
- 1 to 2 tablespoons honey
👩🍳 Instructions
- Stir peanut butter and honey together.
- Mix in the carob powder until evenly distributed.
- Add the oat flour.
- Let the mixture rest for 5 minutes.
- Shape into small bites.
- Lightly flatten them.
- Refrigerate for at least 1 hour.
💡For training: Make each treat much smaller than a normal snack so your dog can eat it quickly between repetitions.
Carob, not cocoa: Never substitute cocoa powder or chocolate. Chocolate is toxic to dogs; carob is commonly used as a dog-safe alternative.
🧊 Storage: Keep refrigerated for up to 5 days or freeze for up to 3 months.
Need more small, high-value rewards? Try these homemade dog training treats for your next training session.
14. Carob Banana No Bake Bites
⭐ Best for: A peanut-butter-free carob treat
Banana gives these carob bites a softer, chewier texture without needing peanut butter. The rich brown carob and lighter banana-oat mixture also make them one of the more visually distinctive treats in the collection.
🥣 Ingredients
- 1 ripe banana
- 2 tablespoons unsweetened carob powder
- 1½ cups rolled oats
- 1 tablespoon honey, optional
👩🍳 Instructions
- Mash the banana until smooth.
- Stir in the carob powder.
- Add honey if using.
- Mix in the rolled oats.
- Rest for about 10 minutes.
- Shape into small flattened bites.
- Refrigerate for at least 1 hour.
💡Pretty finish: Roll a few bites through finely ground oats so you have both dark and oat-coated treats in the same batch.
🧊 Storage: Keep refrigerated for up to 4 days or freeze for up to 3 months.
🌿 One More Flavor to Try
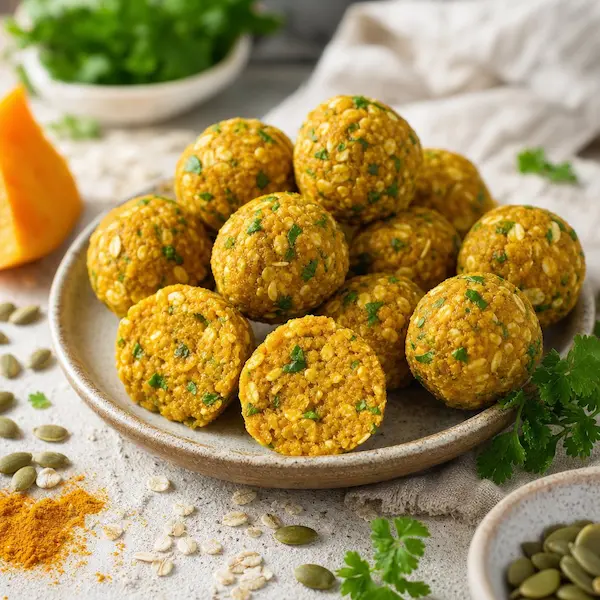
15. Pumpkin Turmeric Parsley No Bake Bites
⭐ Best for: A savory, functional-style treat
This final recipe takes a different direction from the peanut butter and fruit-based treats.
Coconut oil, turmeric, and fresh parsley create a savory-looking bite with a golden color and visible green flecks, while oat flour helps everything hold together once chilled.
🥣 Ingredients
- ½ cup plain pumpkin puree
- 1¼ cups oat flour
- 2 tablespoons fresh flat-leaf parsley, finely chopped
- ⅛ teaspoon turmeric
- 1 tablespoon coconut oil, melted
👩🍳 Instructions
- Mix the pumpkin and melted coconut oil.
- Stir in the parsley and turmeric.
- Gradually add the oat flour.
- Mix until a soft dough forms.
- Rest for about 5 minutes.
- Shape into small flattened bites.
- Refrigerate for at least 1 hour.
🎯 Important: Think of these as homemade treats, not as a treatment for inflammation or another health condition. If your dog has a medical condition or takes medication, ask your veterinarian before adding concentrated herbs or supplements to the diet.
🧊 Storage: Keep refrigerated for up to 5 days or freeze for up to 3 months.
Quick Reference: All 15 No Bake Dog Treats
Want to compare everything before choosing your next batch?
| Recipe | Main Flavor | Format | Active Prep | Chill Time |
|---|---|---|---|---|
| 1. Peanut Butter Balls | Peanut butter | Bites | 10 min | 1 hr |
| 2. PB Banana Bites | PB + banana | Bites | 10 min | 1 hr |
| 3. PB Pumpkin Squares | PB + pumpkin | Squares | 10 min | 2 hrs |
| 4. PB Coconut Bites | PB + coconut | Bites | 15 min | 1 hr |
| 5. Pumpkin Oat Balls | Pumpkin | Bites | 10 min | 1 hr |
| 6. Pumpkin Yogurt Drops | Pumpkin + yogurt | Drops | 10 min | 2 hrs |
| 7. Pumpkin PB Bars | Pumpkin + PB | Bars | 10 min | 2 hrs |
| 8. Banana Oat Balls | Banana | Bites | 10 min | 1 hr |
| 9. Blueberry Banana Bites | Banana + blueberry | Bites | 15 min | 1 hr |
| 10. Strawberry Banana Hearts | Strawberry + banana | Molded | 15 min | 2 hrs |
| 11. Yogurt Honey Drops | Yogurt | Drops | 10 min | 2 hrs |
| 12. Kefir Blueberry Bites | Kefir + blueberry | Drops | 10 min | 2 hrs |
| 13. Carob PB Balls | Carob + PB | Bites | 10 min | 1 hr |
| 14. Carob Banana Bites | Carob + banana | Bites | 10 min | 1 hr |
| 15. Pumpkin Turmeric Bites | Pumpkin + herbs | Bites | 15 min | 1 hr |
Why No-Bake Dog Treats Are So Easy to Make
Baked dog biscuits depend on heat to cook and set the dough.
No bake dog treats take a simpler route: combine a moist ingredient with something absorbent, shape the mixture, and let the refrigerator do the rest.
Three ingredients appear again and again in these recipes.
Peanut Butter
Peanut butter gives oat-based mixtures a thick, sticky texture that is easy to shape.
A thicker peanut butter generally produces a firmer mixture, but the exact consistency varies from brand to brand.
Always check the ingredient label for xylitol before using peanut butter in dog treats. The FDA specifically warns dog owners to check nut butter labels because xylitol can be toxic to dogs.
Mashed Banana
Ripe banana provides moisture and natural sweetness.
Because bananas vary so much in size and ripeness, banana recipes sometimes need a little more or less oat than the amount listed.
Treat the oat measurement as a starting point and adjust until the mixture is easy to shape.
Pumpkin Puree
Plain pumpkin puree creates a soft, moist mixture that works particularly well with oat flour or rolled oats.
Make sure the can says 100% pumpkin rather than pumpkin pie filling.
Why the Resting Step Matters
You’ll notice that many recipes tell you to leave the mixture alone for 5 to 10 minutes before shaping it.
That short wait gives the oats time to absorb moisture.
If you try to roll a pumpkin or banana mixture immediately, it may feel frustratingly sticky. Give it a few minutes and it often becomes much easier to handle.
That’s the basic no-bake formula:
Mix → Rest → Shape → Chill → Treat
No Bake Dog Treat Troubleshooting
Even very simple recipes can behave differently depending on your peanut butter, banana size, yogurt consistency, and how finely your oats are ground.
Here’s how to fix the most common problems.
My Mixture Is Too Sticky
First, let it rest for another 5 minutes.
Still sticky?
Add rolled oats or oat flour one tablespoon at a time until you can shape it comfortably.
Slightly damp hands can also make rolling easier.
My Mixture Is Too Dry or Crumbly
Add a little more of the wet ingredient already used in the recipe.
Depending on the recipe, that might be:
- Peanut butter
- Pumpkin
- Mashed banana
- Yogurt
- Kefir
Start with just one teaspoon at a time. You can always add more.
My Treats Won’t Hold Their Shape
Give them more chill time.
Return the tray to the refrigerator for another 30 to 60 minutes.
If they’re still too soft, work a little extra oat flour into the mixture and reshape.
My Yogurt Drops Keep Spreading
The mixture is too thin.
Add oat flour one tablespoon at a time until each spoonful holds a soft mound instead of running across the tray.
My Frozen Treats Are Too Hard
Move a few from the freezer to the refrigerator before serving.
That lets you keep the main batch frozen while maintaining a softer refrigerator-temperature supply for everyday treats.
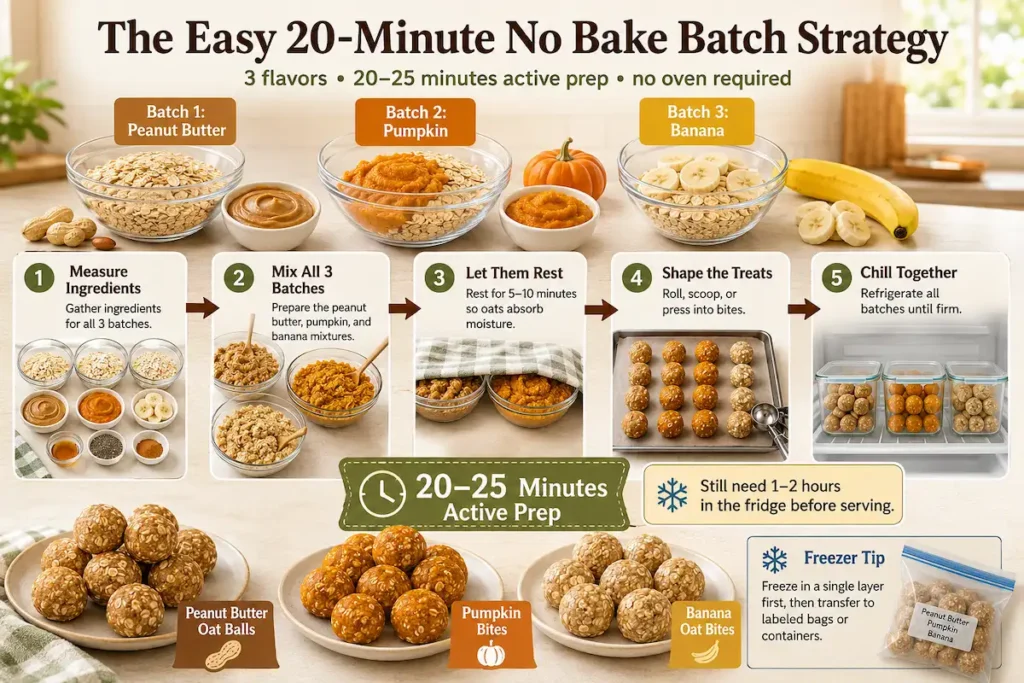
The Easy 20-Minute No Bake Batch Strategy
One recipe is easy.
Three recipes can still be easy if you make them assembly-line style.
If quick prep is your priority, don’t miss these 20 easy 3-ingredient dog treats you can make with minimal hands-on time.
Choose three different bases:
Batch 1: Peanut butter
Batch 2: Pumpkin
Batch 3: Banana
Then:
- Measure the ingredients for all three.
- Mix all three batches.
- Let them rest at the same time.
- Shape one batch after another.
- Put everything into the refrigerator together.
In roughly 20 to 25 minutes of active kitchen time, you can have several different flavors chilling at once.
They still need their normal refrigerator time before serving, but your actual hands-on work stays surprisingly short.
Easy Freezer Strategy
Once chilled or frozen firm:
- Arrange the treats in a single layer.
- Freeze until solid.
- Transfer them to a labeled freezer container or bag.
- Write the recipe name and date on the label.
- Move only a few treats to the refrigerator at a time.
This is especially useful if you like making multiple recipes in one weekend instead of prepping dog treats every few days.
How to Store No Bake Dog Treats
Unlike dry baked biscuits, these homemade no bake dog treats contain moist ingredients, so they should not sit in a room-temperature treat jar for days.
Refrigerator
Keep a small everyday supply in a covered container in the refrigerator.
Recipes containing fresh berries, banana, yogurt, or kefir are especially good candidates for smaller refrigerator batches.
Freezer
Freeze the extras if you make a larger batch.
A single-layer freeze before transferring the treats into a container helps keep individual pieces from sticking together.
Before Serving
If a frozen treat is very firm, thaw it in the refrigerator before feeding.
Always choose a treat size and shape appropriate for your dog and supervise as needed. WSAVA recommends treats remain under 10% of daily calories, never replace the main diet, and be appropriately sized to reduce choking risk.
If homemade treats develop an unusual smell, color, mold, or texture, throw them away.
Final Thoughts
Homemade dog treats don’t have to mean preheating the oven, rolling dough across the kitchen counter, and waiting for trays of biscuits to bake.
These 15 no bake dog treats give you plenty of easier options using ingredients you may already have at home.
Start with the 3-Ingredient Peanut Butter No Bake Balls if you want the simplest first batch.
Try the Banana Oat Balls if you need something without peanut butter.
Make the Strawberry Banana Hearts when you want something cute enough for a birthday or Valentine’s Day.
And when it’s too hot to even think about turning on the oven, pull out this list and make a chilled batch instead.
No oven. Simple ingredients. Fifteen different treats to try.